Wednesday, November 30, 2016

Lutterloh Patterns Come Alive!

Supplement 302 - Model #253 - Autumn 2016
Trousers with Button Front Closure

This will be my outfit for a casual holiday party this weekend. I'll likely pair it with a black velvet jacket or a cashmere cardigan. Despite the trouble I had figuring out the sewing sequence for this pattern it really was very well designed.  

Pattern Drafting Hints:
Enlarging this pattern to my size was very straightforward as with most Lutterloh patterns. The pieces all fit together very nicely and they produced a nice fitting pair of slacks. The greatest challenge I encountered was with figuring out the sewing order.
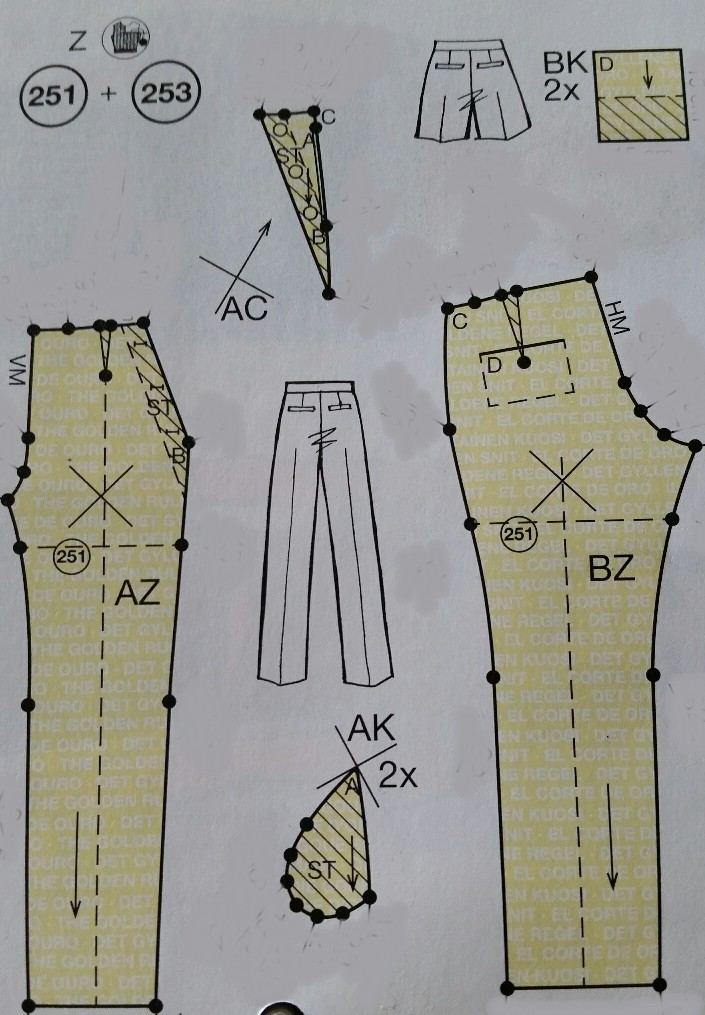
As you can see from the pattern pieces there are very few letters to direct you. A,B,C, and D are the only hints you get and that really only gets you through the front and back pockets. The real puzzle begins once you attach the facings and try to overlap the front legs onto the side front. I won't detail my sewing sequence here because it was fraught with pinning and sewing followed by ripping and eventually hand basting to get the layers in the right order. 
 
When you finally get to sewing the outside leg seam there are a total of 6 layers of fabric to sew together at the point of the triangular side front where all the facings meet. Make sure to pin and check before sewing this spot to be certain all the facings will be caught in the seam and stay tucked inside the leg. 
 
This is definitely not a fit as you go type of pattern. Once you get those side seams sewn you do not want to mess with them again! You will still have the center front and center back seam for minor adjustments but this is not the first Lutterloh pants you should be making. As long as you've already made some Lutterloh pants to determine the shape of your hip curve and length and depth of your crotch this pattern should fit just fine with adjustments that you've already worked out. Just draw it to your regular Lutterloh measurements, make your usual figure alterations and take your time assembling the pieces of the puzzle!
 
Fabric Used/Suggested:
Although this pattern is clearly a trouser pattern I chose to make mine in a stretch denim. This does affect the hang of the pants but I was trying to replicate my Dittos jeans that I remember from my youth. As soon as I saw the pattern I knew exactly how I wanted them to look. I think I got pretty close considering I no longer have the figure of a teenager ;). 
 
To cut down on the bulk of the many layers I used a navy broadcloth for the facings and pocket bags. I also sewed navy twill tape into the waistband to prevent stretching out of shape.
 
Be sure to use a fabric that will take a press. This will save you frustration when lining up all those layers at the side seams.
 
Design Changes: 
I only made one small design change to this pattern. I wanted to avoid any gaping at the button closure so I used 5 buttons on each side instead of 4. The look on the model was exactly what I was hoping for. Other than adding a little width at the thighs and length at the bottom I made no adjustments to this pattern. I may go back and sew the back crotch just a bit deeper but since these are actually trouser jeans now I may leave the closer fitting crotch.
 
Closing Hints:
I must admit I'm happy to be done with these pants so I can move on to some simpler sewing projects. Don't get me wrong, I love how they turned out in the end, but the puzzle of the sewing sequence does not make me want to repeat the experience. Overall I'd say this really is an excellently drafted pattern but unless you are up for a challenge I would leave this pattern to the more expert seamstresses.
 
I hope you all make some time for sewing in the busy holiday season ahead. I'm sure glad I did.
 
Ann in Calif.

Tuesday, October 18, 2016

Autumn coat guest review


It's nice to see some of our readers are 
 making Lutterloh patterns & sewing them!


Our Guest pattern maker is Bernice
she used a coat pattern from 2013
Here is her report

This autumn I needed to make a coat to wear over my 
sleeveless dress so this pattern attracted my eye. 
It is a princess seam pattern with the dart starting 
from the armhole to the waist line.


The coatee is 52 cm long which is much shorter than all my other coats.
  I bought a black coat that was on sales and I wanted
 to make one exactly the same length (52 cm) 
but a different pattern and colour. 

In fact the normal length was 55 cm after drafting the Lutterloh model but I didn't leave any allowance for the hem and I took in 3 cm. 


After drafting the pattern I only had to cut the armhole of the 
body a little deeper  to match the sleeve. 


All other measurements were a perfect fit. I used some raw silk fabric. 

I was a bit disappointed that I couldn't match the sleeve 
seams with the armhole seams as they are usually done.


 I took the risk of lining the coat so
 it was a bit difficult without any instructions 
but I finally achieved what I started. 

It gave me great pleasure
 to do the Lutterloh pattern 

Thursday, October 6, 2016

Lutterloh Patterns Come Alive!

Supplement 290 Model #17 - Autumn 2013
Peplum Top with Pencil Skirt

This two piece dress was for a wedding in the mountains on October 1st. The color was perfect for Fall and the short sleeves were just right for our California Indian Summer.

Pattern Drafting Hints:
The princess seams for this top matched up flawlessly after enlarging to my size. The peplum seam fit into the bodice nicely too. There was quite a bit of easing needed to fit the sleeve cap into the armsceye but it was doable with some easing stitches and a lot of steam pressed over a pressing ham. Don't be tempted to end the back zipper of this top at the waist seam. The zipper on this top needs to extend through the waist seam or you won't be able to get it over your shoulders. The eight shaping darts on the skirt are crucial for getting a nice smooth fit over the hips on the pencil skirt.

Fabric Used/Suggested:
This dress made up beautifully in an eggplant colored polyester paisley jacquard. This fabric is a staple at JoAnn's Fabrics in their Silkies selection. There is just a touch of Lycra in this fabric and that did help with a nice smooth fit of the skirt. Because of the peplum a softer, drapier fabric will work best for this set. I made up a test of this top in a lightweight twill and you can see how the firmer fabric makes the peplum stand away from the body.


Design Changes: 
I realize the whole peplum craze is on it's way out but I still love the silhouette for my hourglass figure. You may have noticed that the fashion drawing for this set features a flatter peplum than mine. Every version I've seen made up of this pattern sits flatter in the front but then stands out at the sides. I figured if the sides were going to stand out I would rather add some fullness to the peplum and make it look more purposeful. Below is a photo of my peplum pattern after I split it and spread the pattern to add more fullness at the hem.

Because I didn't want the peplum to stand away from my body like a frill I omitted the facing and just turned and stitched the hem instead. 
The neckline on this pattern is fairly high so on the black top I lowered it by 3/4" and for the final dress lowered it another 1/2" and cut it into a slight V.
The skirt didn't require any alteration except for length. I did stabilize the hem with a strip of knit interfacing and hand stitched the hem once turned up. 

Closing Hints:
I noticed a similar knit peplum top in the newest 2016 supplement so I may use this pattern for a knit top in the near future. The fit of the shoulder princess seams is so flattering and could really lend itself to some nice color blocking. The skirt is an absolute classic and the two shorter and two longer darts both front and back make getting a perfect fit much easier. The skirt pattern could work nicely in a firm stable knit too. Although I put off making this pattern for a long time I'm so glad I finally got around to it. 

So, how do you feel about peplums; are you a fan or not? Please leave your comments below. We check for and post the comments frequently every day.     

Thursday, September 1, 2016

Lutterloh Patterns Come Alive!

Supplement 301 - Model #154 - Summer 2016
 Classic Long Blouse (turned shirt dress)

While I wait for my newest Supplement #302 to arrive I thought I'd share with you what I made from the last supplement. It's funny, right before this supplement arrived in my mailbox I had a dream I was making a shirt dress out of light colored chambray. When I saw this style in supp. 301 I knew it was meant to be!

Pattern Drafting Hints: 
The letters next to the pattern number indicate this is a blouse but I just couldn't imagine wearing a blouse this long. My intention all along was to belt it for a dress. Just to get an idea of how roomy this "blouse" really is here is a photo without the belt.
It really is as loose as it appears in the drawing. Oh, and the sides really are cut very high to create that classic shirt tail hem. There are nice long shaping darts in the back but without a belt I feel like this should have more shape in the front too. I suppose it depends on how you want to style it.

Fabric Used/Suggested: 
Unfortunately I could not find the light colored chambray I was hoping for at my fabric store. I ended up using a lovely Nicole Miller fabric in a dreamy 100% Lyocell fabrication. Lyocell is actually a type of rayon so the fabric care recommendations are very similar. This fabric does feel just a little heavier than challis. I would imagine almost any lightweight woven fabric would do for this blouse.

Design Changes: 
As you can see I left the sleeves and pocket off of this blouse. If I had put sleeves on it I knew I wouldn't be able to wear it until the weather cooled. Leaving the sleeves off lead me to another design change that wasn't expected. The arm holes had such a huge gaping issue that I had to put a fitting dart in from the arm hole to the bust. Normally this would require reshaping the sleeve too but since I didn't have any this was not an issue. The pocket I felt would draw too much attention to my bust and I would never use it so why bother? So, other than my usual bust and length alterations this pattern went together easy, peasy. 

Closing Hints: 
I have to say I like this blouse well enough but I'm afraid it isn't the shirt dress of my dreams. I'll be on the lookout for another pattern with more shaping and perhaps a yoke at the top. Now that the weather should be getting cooler I suppose I may be over the whole shirt dress thing by next Summer anyway, we'll see. 

So, am I the only one who has dreams of sewing? Feel free to leave your comments below.

Happy sewing to all,
Ann in Calif.     

Sunday, August 7, 2016

Lutterloh Patterns Come Alive!

Supplement 289 - Model#267 - Summer 2013
 Chevron Bias Cut Skirt

This skirt is a maxi length, knit version of the original pattern. I wanted an easy pull on skirt and found the chevron pattern really appealing for just a little twist. I felt head to toe chevron stripes would be a little overwhelming so I opted to skip the matching top.
.
Pattern Drafting Hints:
This pattern is really simple to enlarge to your personal size however laying it out on fabric is a little fussy. Do make sure to cut each of the four panels in a single layer or it will be nearly impossible to get the stripes to match. If you lay the pattern pieces out very carefully you can get both the back and front stripes to match and even the sides. I cut one front piece and one back piece on the right side of the fabric and then laid each one down, right sides together, to cut the opposite side. This way I was able to pin each stripe to make sure they didn't shift while cutting the alternating side.

Fabric Used/Suggested:
Although the pattern does not call for it I used a knit fabric for this skirt. The striped rib knit I used is lightweight and perhaps not the best choice for this pattern. Don't get me wrong, I love the end result but getting there was no walk in the park. Because of it's lightweight nature my fabric was shifty and easily stretched out of shape. Getting the stripes lined up was like wrangling salamanders. If I were to make this skirt again I would be sure to use a heavier weight, good quality knit that I was certain was printed on grain. Of course, as long as you made this skirt with the zipper that was intended you could make it with nearly any fabric with at least a little drape. The bias cut will give you even more movement so many fabrics would be suitable.

Design Changes:
From the photo you can see that my version is only a nod to the original pattern. I was after the basic shape and cool chevron design of this pattern and that's exactly what I got. To make this pattern into a maxi length I started with measuring the drawn pattern and then compared it to the finished length I wanted. I needed to add at least 15 inches just to reach my ankles but I didn't want to widen the hem. The photo below is my pattern after adding the necessary length.
You'll see that I split the pattern horizontally at the cross mark as the Lutterloh company suggests. Before cutting it apart to add paper I also drew a vertical line from top to bottom so I could be sure to keep it straight once all the extra paper was added. 

The other major design change was to substitute a stretchy, fold over, yoga type waistband for the original waistband facings. 
If you want to replicate this type of waistband you can use the tutorial found here. Don't worry that the tutorial appears to be for a child's skirt. The math works fine for adults too. Just make sure that your waistband fabric contains a good percentage of spandex or Lycra. I once made one from a stretchy interlock but once it stretched out the skirt started to sag and wouldn't recover until washed again.

Conclusion:
This skirt is as comfortable as it is cute! I could see myself making a bunch more of these in different stripes, prints or even solids. The knit fabric makes it casual but if you wanted to put the zipper in with facings there's no reason it couldn't be dressed up with a silky or similarly drapey fabric.

Since we're approaching the middle of August I'd like to remind you to keep an eye out for the newest Lutterloh supplement #302 due out any day now. It usually shows up on the German Lutterloh site first here but feel free to look for it on the Lutterloh site in your home country.

So folks, keep sewing with those Lutterloh patterns and be sure to use your imagination to turn them into any style your little heart desires.

Happy sewing from,
Ann in Calif.    

Sunday, July 10, 2016

Vintage Lutterloh Gallery!

So Folks, Our Vintage Lutterloh Sewcial has concluded. 
We would like to present the work of our talented followers below.
(Listed in the order received) 
1. First name and country where you live.
Susan, Mexico
2. What appealed to you about this vintage pattern?
I like the gathered sleeve for airflow and to accommodate my large biceps. The yoke offers the opportunity to mix fabrics and highlight details. As soon as I saw this, I knew that I would mix the crocheted lace and the dotted cotton.
3. What is your favorite period of vintage Lutterloh fashions? 
I am not a big "vintage" fan. And I take exception to the 80s being vintage! But I have a special fondness for the 80s patterns because I  started my Lutterloh journey in the 80s. I mixed and matched pattern pieces and made the same dresses for my daughter and me. But not matching fabrics, that would have been so uncool!
 1. First name and country where you live.

Susan Mexico
2. What appealed to you about this vintage pattern?
I liked the short, full sleeves, the collar and the back shoulder darts. Because of those back shoulder darts, I am planning to use this as a sloper for sleeveless woven tops.
3. What is your favorite period of vintage Lutterloh fashions?  
I am still fiddling around with "vintage" Lutterloh. I like 60s, 70s,80s.
I also like the look of the 30s, but they are very complicated which means a lot of time cutting marking and testing!
__________________________________________________________________
 1. First name and country where you live.
Ann in Calif. - U.S.A.
 2. What appealed to you about this vintage pattern?
My brother has finally worn through our Dad's shirts from the sixties. I figured the best way to replicate one would be to use a sixties pattern. This looks very much like one of Dad's shirts and my brother is delighted. I did make an artistic decision to change the top-stitching a little and it makes this shirt now a true one of a kind.
3. What is your favorite period of vintage Lutterloh fashions?
I prefer the Lutterloh patterns of the 1940s. I have some truly fantastic photos of my mother and her sisters in these fashions! 
__________________________________________________________________
   
 1. First name and country where you live.
 My name is Ruth and I come from Birmingham in the UK.
 2. What appealed to you about this vintage pattern?
 I love the collar/tie, and pockets on this 1950s vintage dress and think it would be great to wear for work. It is really comfortable and can be cinched in with a belt to get a look more akin to the model's version (if you happen to have an 18" waist!).
3. What is your favorite period of vintage Lutterloh fashions?
The 1950s are my favourite vintage Lutterloh patterns. I love the silhouettes, the elegant cuts and the feminine details. The designs are so flattering and the illustrations are wonderful with a matching array of hats, gloves, belts and bags. I also think the classic shapes make them very wearable today and can't wait to make some more items to wear alongside designs from the current Lutterloh supplements. 
__________________________________________________________________

Thank you ladies so much for participating in our 
Strictly Vintage Lutterloh Sewcial!

Isn't it nice to have a new garment to wear knowing you put your heart into it?
Wear it with pride!

Keep on sewing those Lutterloh patterns, new and old, and feel free to contact us about showcasing your Lutterloh fashions here on the blog.

Smiles,
Fonnell and Ann