Thursday, December 18, 2014

Lutterloh Patterns Come Alive!

 
 Childrens' Collection #2/ Model # 9 - 2013
Girls T -Shirt

FYI: This pattern also appears as the last model in Supplement #284 from 2012.

This T-Shirt is for my ten year old niece, I'll call her K. As you can see, the pattern is suggested for 4-8 year olds but my K is very thin and petite so I can usually get away with a slightly younger pattern. I did notice though, as this top languished away on my sewing table, that K has all of a sudden sprouted tiny boobs. I may need to start using the teen patterns and just scale down. Up until now I have had great success with using a pattern for younger girls and adding several inches to the length.


Pattern Drafting Hints:
The back view for this pattern indicates a center back seam with a keyhole opening.
Since I know K was not going to fuss with a button closure on a T-Shirt I drew the pattern with a fold at the center back and no opening. I'll discuss how I made this work later.

Fabric Used/Suggested:
The body of the T-Shirt is a poly/cotton interlock and the sleeves are a remnant of cotton /lycra left over from a summer skirt. I would suggest a fabric with at least some crosswise stretch for this top just for comfort and wearability for a child.

Design Changes:
As mentioned above I eliminated the center back seam and closure at the neck on this top. Because of this change I also had to abandon the facings since the understitching required to keep them inside also negated any stretch left in the neck hole. I initially attached the facings to the neck but soon realized K's head would never fit through that hole without the opening in back. 

I'll admit this T-Shirt did spend a short while in the waste basket until I suddenly thought of a solution. I ended up cutting off the facings and used a satin edge elastic instead. Since the front of this top is gathered I still needed to use the facing patterns to determine the length for the elastic.
I turned my tape measure on edge to measure the edge of the facings that should attach to the neck edge. I cut the elastic at a 1:1 ratio, according to the facings, to fit the neck and then marked the center front, center back and the points at which the front should gather. The elastic was sewn at the 1:1 ratio all around the back neck and when I got to the gathered area I just stretched the elastic to fit the gathers. 
The elastic did need a tiny zig zag top stitch to keep it from flipping to the outside. Although the look is not the same as the original fashion drawing I'm still pleased with the outcome. I know K will appreciate the ease of wearing that the elastic neck provides.

Closing Tips: 
You may remember the tip I used from my last post on hemming my knit dress with fusible knit interfacing. See the tip at the end of this post.
Well, I couldn't afford to lose any length on this top so I opted for fusible thread instead.
 
I used fusible thread in the lower looper of my serger to create a similar fusible hem on the inside of this T-Shirt. When the hem is pressed up, right at the edge of the overlock stitches, the hem is neatly fused to the underside and I just finished with the same tiny zig zag top stitch that was used at the neck. I have found this to be a great alternative to a narrow coverstitch when the fabric refuses to stay pressed. 

If you have any questions or comments about our reviews please post them to the comments section below. We'd love to help you get the most out of your Lutterloh patterns too!

Happy Sewing and Happy Holidays from Ann and Fonnell!


Saturday, November 22, 2014

Lutterloh Patterns Come Alive!

Supplement 294 Model #151 - Fall 2014
Short Sleeved/Belted Dress

We're starting a new feature on our Lutterloh blog. Fonnell and I will be sewing fashions from the currently available supplement and then reviewing them for you here. This will give everyone the opportunity to see a few of the fashions on real people and spark more conversation about these fabulous patterns. So, here we go, my version of model #151.

Pattern Drafting Hints:
When I draw out my patterns I always make a copy first so I can cut it apart into the separate pieces such as front, back, collar, sleeves etc. This way I can tape each tiny pattern piece to my pattern paper and leave them there in case I need to check for accuracy later. 

Fabric Used/Suggested:
I used a rayon/spandex jersey for this dress. I realize there's no knit symbol indicated on this pattern but that rarely stops me from using the fabrics that I like to wear. You can see from the photo my fabric choice resulted in a dress with a much more relaxed drape.

I'm sure in a firmer woven fabric the details such as the pleats at the neckline and gathers below the belt would be more pronounced. This dress would also look lovely in a light twill, suedecloth, crepe or suiting fabric.

Design Changes:
Because of the jersey I used I was able to eliminate the back zipper altogether. I also chose to forgo the self fabric belt. I didn't think the fabric would be firm enough to withstand all the bending at the waist. 
The neckline on my dress looks different because I found the pleats too puffy for my already ample bustline. Instead I sewed the pleats down along the fold markings to form tucks.

Closing Tips:
This pattern went together easily enough. Just what you'd expect from a Lutterloh. I'd like to share with you one last tip that I almost always use when hemming knit garments. To avoid that wavy look that sometimes happens when hemming knits I like to use strips of fusible knit interfacing to stabilize the hems. First determine what the depth of the hem will be and cut enough strips, with a rotary cutter, to go all the way around. Do the same for the sleeves. Then serge the strips, fusible side up, to the inside of the hem.
The strips mark the depth of the hem as you fold right at the edge of the strips. When you press up the hem it is stabilized and held in place for top stitching at the same time.

I sure hope you find this review helpful. Believe me, the more you use these patterns the easier they get to use. If this review has left you with any questions please post them in the comments. We'd love to hear what you would really like to see in a Lutterloh pattern review.

Happy Sewing,

Ann in Calif.


Thursday, November 20, 2014

NEW! Lutterloh Supplement 295 Available!

 Have you seen it? The newest Lutterloh Supplement #295 is available on the German Lutterloh site here:

It's also available on the British site here:

Unfortunately we always have to wait a while before its available to order from the U.S. site here:
but we'll be patient. I see some interesting zippered pocket details and lots of knit pullover top patterns. There are three pages of full figure patterns as well as one of the new slim figure patterns. No mens or childrens patterns in this issue though.

Have fun perusing the new patterns so you can start planning your sewing now.

Fonnell and I are making up some Lutterloh fashions that we'll be reviewing soon so stay tuned.

Sunday, October 26, 2014

FAQ Our favorites!

People ask questions of us 
on whatever posting they land. 
 We seem to answer them on those pages thinking
 that is where they will check back for our answer.

Wouldn't you like to see some of those

QUESTIONS and ANSWERS?

Here are Fonnell and Ann's favorite Questions and Answers. 
Maybe you will find some valuable information here.


QUESTION: Where do I use the bust measurements 
and where do I use the hip measurements? 
ANSWER: Bust measurement is used in all parts above and 
including the waist.That includes collars, necklines, sleeves, front and 
back upper bodice pieces. Hip measurements are used for all pattern 
parts below the waist as in skirts, pants and shorts.

QUESTION: How exactly should I take my bust and hip measurements?
 
ANSWER: If you check out this link : http://www.lutterloh.com/ you will 
find a couple videos that should explain this more clearly. 
It is a little different than you would regularly take measurements.


QUESTION: Can I buy a replacement for my Lutterloh tape separately 
or do I have to buy the whole kit?  
ANSWER: We are not a Lutterloh System dealer 
but if you check out the links in our sidebar you should find a dealer that you could ask.


QUESTION: Where can I buy new Lutterloh patterns? 

Can I buy them individually?
ANSWER: Please check the links in our sidebar for a Lutterloh dealer. 
Lutterloh Patterns are sold in quarterly supplements of 40 patterns to a booklet. 
They are not offered for individual sale through Lutterloh.


QUESTION: Where can I buy older or vintage Lutterloh patterns?
 
ANSWER: The U.S. and European Lutterloh websites offer many of the 
older supplements dating back about 20 years. 
For supplements or whole kits older than this watch for offers 
on Ebay, Etsy or other popular auction sites. 
Prices vary be sure you know what older kits are selling for.


QUESTION: Will the Lutterloh company draft a pattern from my own 

design or a photo?
ANSWER: They never have been known to do that but you could 

always ask them.


QUESTION: Can I give you a pattern number and year so you can 

look at what I'm working on?
ANSWER: Many people do this however we would have to buy 

every pattern and we just can't do that. We are not part of Lutterloh 
so we have no way to have everyone's pattern. Sometimes we get 
lucky and can find it in one of our books. Mostly we can't.  
Please send us a copy of your pattern so we can help answer 
your questions.


QUESTION: Can I use the Lutterloh scale and tape measure to enlarge 

other small scale pattern drawings?
ANSWER: No, the Lutterloh System uses a formula based on the 

Golden Rule to enlarge only their patterns. There is no way of 
knowing if other drawings are drawn proportionally correct.


QUESTION: Do I have to make a vest and 

where is there a pattern for this vest?
ANSWER: It is a fitting vest. Once it's made you will make adjustments 
to make the bodice fit you better and the vest even goes past your 
high hip so you can adjust this. The goal is to note every change you make.
You will make these same changes in every Lutterloh pattern. 
The Vest is a fast discovery way to fitting, you may just start making 
patterns you like but do paper fit, and note every change you make in 
the first few outfits. We have a posting listed on the right that helps 
you take your vest pattern a step further. Check it out! 
 Check with a Lutterloh dealer for a pattern, we have those dealers 
listed on the right sidebar.


QUESTION: My pattern looks askew on the paper once I’m done enlarging
 it. Should I still use it?
ANSWER: Remember that each person will use their own measurements 

to draw their pattern. Because we each have our own combination 
of bust to hip ratio this will sometimes cause the pattern to tilt away from 
the original tiny drawing. As long as you are following the directions 
carefully for drawing out your dots and connecting them your 
pattern should work just fine. Check out our links on the right 
sidebar to find a post on drawing out your patterns. 
Trust the system and make sure to paper fit the pattern.


QUESTION: Is there an index for Lutterloh Patterns somewhere 

or do I have to flip through all my patterns to find the one I need?
ANSWER: Unfortunately there is no master index for the huge collection 

of Lutterloh Patterns spanning nearly 80 years. However since more than 
half of those have been published on individual pages there is no stopping 
you from categorizing them in your binders in whatever order you like.


QUESTION: Ease, everyone asks how much ease is in each pattern. 

Ease is how much space the pattern allows for movement in the garment.
ANSWER: There was much less ease in the fashions of the 1950's, 1960's 

and 1970's. Ease seems to be growing in the Lutterloh patterns. 
The style of a fashion will denote less ease also. 
I've never seen a pencil skirt with but a little ease. 
Knit fashions in Lutterloh can't tell how stretchy your fabric is so ease 
will be greatly determined by how far that fabric stretches against a ruler. 
We have several postings on our right bar about ease. 
You should find them all useful.


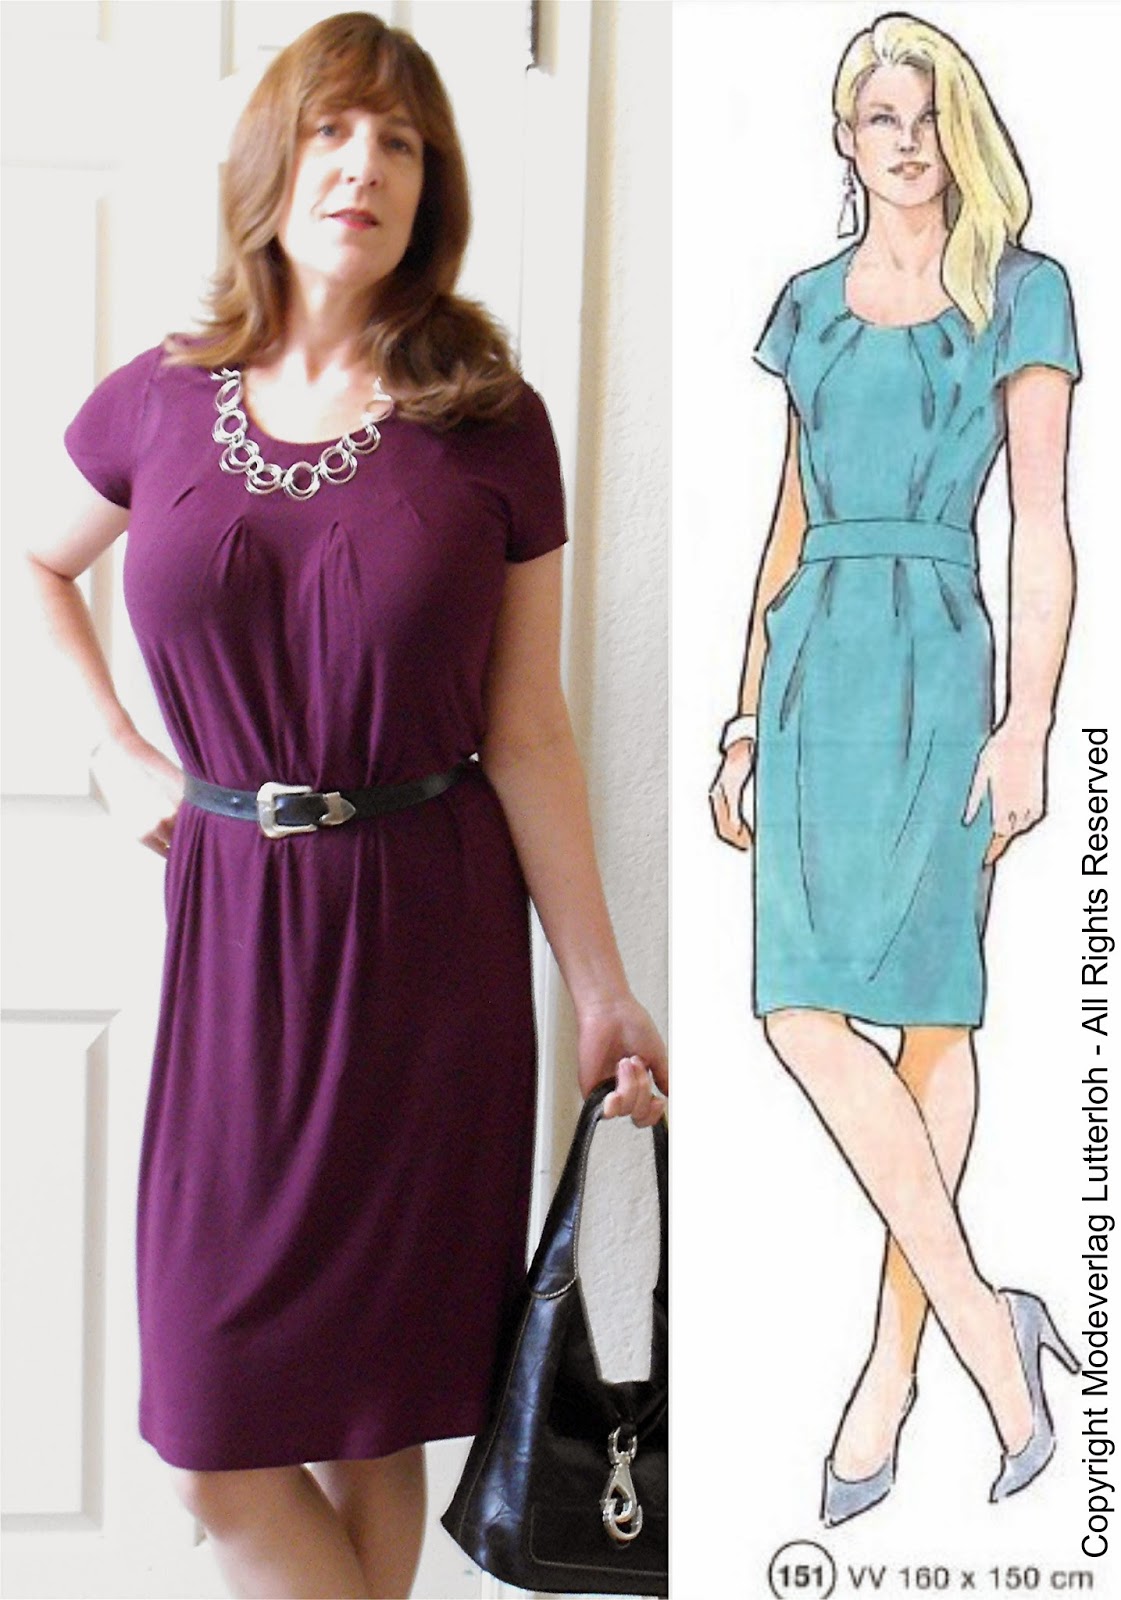
QUESTION: Can you explain how to calculate the yardage needed 
for the pattern I'm making?
ANSWER: Most of the patterns have two numbers right under the 

fashion drawing. That is the amount of fabric it would take to 
make that garment if your bust is 92 cm If your bust isn't that 
size you can learn more about fabric calculations at this posting 
on our blog:  http://sewingnhumming.blogspot.com/2009/07/fabric-requirements.html


QUESTION: Is there something Fonnell would like to tell us about Lutterloh?
ANSWER: YES! no pattern, including Lutterloh patterns know how long
 you want your sleeves, your pants, your skirts, your tops, your dresses. 
Only you know so paper fit every pattern you make. 
How do you paper fit? Lay the paper pattern up to your body.
It is only half a pattern so the center should reach your center, 
the sides should meet your sides. I don't put seam allowances on
my patterns until I lay them on the fabric. I can clearly see when a 
pattern is not wide enough and I can clearly see when I want something 
longer or shorter. I can then take my pattern back to my paper roll 
and tape changes to it or cut and remove parts and paper fit again. 
I'm working alone so I pin the patterns right to my clothes 
I have on to look at all angles of the fit.

QUESTION: Is there something Ann would like to tell us about Lutterloh?

 ANSWER: Yes, although we enlarge the Lutterloh patterns to our
unique measurements rarely will any pattern fit without at least some
personal alterations.  By making the fitting vest first each person can 
discover which alterations will achieve the best fit for them.  
If you are new to altering your patterns to get the optimal fit, 
your best resource would be a reference book detailing 
these alterations.  It is usually recommended to start from 
the top of the pattern and work your way down doing just one 
alteration at a time.  This may require a few test garments or 
"muslins" but the time is well worth it since these will
be the same alterations you will make for each Lutterloh pattern thereafter.
There are a few recommendations for fitting books at the end of this post:

Friday, October 17, 2014

The Lutterloh System Symbols Page Revisited

  The Lutterloh Patterns have always used a symbols page to mark their sewing instructions and pattern pieces. We get lots of questions from users of these patterns that I hope to explain here.


   Here is a photo of a symbols page from a 2014 supplement of Lutterloh patterns. The most recent addition to the chart is the bottom symbol that looks like an outline of a dress form which indicates these patterns are for very slim figures. You might wonder, how slim are we talking about? I wanted to be sure so I e-mailed Frank Lutterloh of Fashion Unlimited and asked for clarification. I was told that for these patterns to be the most effective they should be used for ladies with a bust measurement of no more than 90cm. The fuller figure symbol of the dark dress form will appear on patterns that are most suitable for ladies with a bust or hip measurement of at least 110cm.

   The XXL system, which is a completely different system with it's own unique measuring scale, should only be used by those with a bust or hip measurement of at least 130cm. Many have found though that if they are close to the lower limit of the XXL set that the full figure patterns can work just fine with perhaps some more generous seam allowances. I am mentioning these measurements in centimeters because we should all be using the scale to draw the patterns so it's just easier to start with the number we will use on the scale.

   Just remember that both design ease and wearing ease are built into all the Lutterloh Patterns. I have heard that some feel the full figure patterns have less defined curves overall (more ease). This would explain why many of the FF patterns will still work for the XXL size woman yet some who fit into the XXL size range find the XXL patterns too loose. I've also noticed that the slim figure patterns have less pronounced hip curves. However, they are also narrower all over leaving less room (or ease) for much bust or hip curve. With more distinct pattern size ranges for different figure types we will find some overlap into the patterns designed for each figure type but of course the average size pattern range will fit the greater number of people.

   Now I'd like to address some of the FAQs that are posted as comments to our blog. Many of these can be answered with a better understanding of the symbols page.


   The photo above shows both a one piece and two piece sleeve. In red I have marked a notch that you could mark to indicate the top of the sleeve where it will meet the shoulder seam. For the sleeve on the right, even though there is only one cross mark to place your pin, you will cut these apart on the bold, solid lines to create two sleeve pieces. The red line I have drawn in indicates where you would mark across the two pieces, and mark notches if you like to be sure they match, before you cut them apart.

   Before you cut them apart you'll also want to mark the grain-line to get them the same for both pieces. If needed, to get a straight line to guide you in marking the grainline, you can draw a line across the pattern pieces at the corners where the armhole seam matches up. This line should run perpendicular to the grainline. Here is a link to a visual for this technique:
http://fashion-incubator.com/how-to-find-the-grainline-on-a-sleeve/
Make sure to mark the little "v" for the front of the sleeve and add seam allowances on any Lutterloh pattern.

   
   This next photo demonstrates a fairly new symbol, added in this century, to the Lutterloh System. The red box is drawn around the straight of grain symbol sitting next to the 90° angle symbol on top of the dashed line at the waist. All these symbols grouped together tells us we should draw the grain-line perpendicular to the waist. Normally the grain-line should run parallel to the center back or center front. Frequently these pieces are placed on a fold so the grain-line is obvious. When there is no fold we need to look for other indicators to find our straight of grain.  


   In the case of the bodice above, the green box is drawn around another example of the grain-line at a 90° angle to the waist because the side seam is not straight. On the bias cut skirt the 90° is replaced with a 45° to indicate the front and back pieces should both be placed with the straight of grain at a 45° angle to the fold or on the true bias.

   The bodice photo is also a good example of multiple pieces drawn from one cross mark. The front (A), the front side (AC), the front yoke (AL) and the front button placket (LL) are all drawn as one piece and then cut apart at the bold, solid lines. You would want to mark the grain-line and any notches you desire, indicated by the red lines at the princess seams, before cutting these apart. The placket has the center front marked on its outermost left line. The front yoke, placket and front bodice would all need their grain-lines marked before cutting these apart. The front side grain-line would be at a right angle to the waist. Again, be sure to add seam allowance to each piece separately.


   Finally, in this last photo there is no waist line to mark a 90° angle, and the center back is not placed on a fold. For these patterns you would align your straight of grain perpendicular to the bottom hem just below the arrow. There are no other symbols to indicate otherwise and the hem just below the arrow is a roughly straight line. In the case of the pants you can see the center front is marked on the fold for the fly so that could be one more line to follow along with a straight line for the crease going from the top dot to the bottom and at a right angle to the hem. As you can see there's lots of pattern information packed into those little symbols scattered all over your Lutterloh System patterns and these don't even scratch the surface of the issue of fitting. Those issues are far more personal to each user and need to be handled on a case by case basis.

   If there are any other symbols that are perplexing you please don't hesitate to post a comment and we'll try to explain them a little further. However, I have to say, there really is no substitute for a good, solid understanding of sewing terms and how to apply them. To that end I'll include a short list of my favorite sewing reference books. Everyone should have at least a couple of these in their library.

General Sewing and Construction:
  • Reader's Digest Complete Guide to Sewing
  • Vogue Sewing
  • Bonfit - Fashion Sewing Instructions
Fitting and Alterations
  • Fitting and Pattern Alteration by Liechty, Rasband and Pottberg-Steineckert
  • The Complete Photo Guide to Perfect Fitting by Sarah Veblen
  • Fit For Real People by Pati Palmer and Marta Alto
  • Fast Fit by Sandra Betzina
I sure hope you've found this post useful. Keep those questions coming and happy sewing!

Ann in Calif.

Thursday, October 16, 2014

WELCOME

You are on the blog that talks about  EVERYTHING LUTTERLOH

I started this blog in 2009 after finding a collection
 of 1950's Lutterloh patterns
It was love at first sight


With my sewing friend Ann we present postings that should help you 
make your Lutterloh pattern & adjust your pattern

We have both tested so many of these sewing patterns,
 for ourselves, family, and friends.
We feel our experience lets us give you the best information
 to make that Lutterloh purchase, or find, work for you!

Soon we will be updating some of our pages 

We are drawing up new fashions and we want to test them
Time to start sewing before the holidays arrive!

Watch for our new up dates.