Monday, May 10, 2010

Yes we are still here

I'm delighted to see new Lutterloh owners getting to work making vests and figuring out the issues to making patterns.

Ann and I have put a lot of great postings you can work from on this blog. You'll see them linked over on the right. We are here just listening in for possible needs so feel free to put your comments on any posting, we do get these.

I hope you are having a good time with all those new patterns. We find a good Lutterloh pattern book great night time reading!

Enjoy!

p.s
There is a link on the right for making knit patterns into woven.


http://sewingnhumming.blogspot.com/2010/01/red-group-using-knits-on-lutterloh.html

Tuesday, March 23, 2010

Some Spring Sewing

So, were you wondering what ever happened with that basic pattern I was slicing and dicing in my previous post - "More Manipulating of Lutterloh Patterns" ?

http://sewingnhumming.blogspot.com/2010/03/more-manipulating-of-lutterloh-patterns.html

Well, I finished the outfits for my niece's birthday present. I'm sorry I can't have her model them for you but her birthday isn't for a couple of weeks yet. Here's some photos of the finished outfits nonetheless.


Here's the pattern that I used for the pants. I eliminated most of the details to make the sewing faster. These are just lightweight cotton capris so I didn't see the need for the pockets and fly zipper anyway.


For the pants pattern I still cut out the front pocket piece in case I wanted to use it later. When I cut out the fabric I just taped the leg pattern over the pocket pattern and cut them as one piece. I still drew in the fly extension on the pattern too but I folded it back at the center front dashed line so I could just sew a center front seam there.


It's hard to see the yoke detail in the back but it's there. I used buttonhole elastic in the back only so the front will still lie nice and flat. That buttonhole elastic really is ingenious for thin little children who only seem to get taller but not much bigger around.


I hope you will all consider these kinds of changes to a basic pattern to stretch your Lutterloh catalog. With a little ingenuity and some testing on inexpensive fabric you really can have a bunch more designs in your repertoire.

Monday, March 15, 2010


Cheryl has been working from the bottom up and we are so delighted she didn't give up. Ann and I both think the Vest has to be the start then all projects get easier. Way to go Cheryl! By the way sleeves are always a bit of a challenge.
F.


Attached is a photo of my finished jacket. I am really pleased with how it turned out. Here's what I did:

First, I made the Lutterloh vest. I used it for a sloper for fitting. I followed your instructions on your blog for that, and it was easier than I expected. Then I made my pattern for this jacket and used the sloper to make sure everything was in the right place, (waist line, bust point, etc.). I made a muslin of the jacket first for practice. I did have to shorten the waist. This jacket is a princess line in front with a two-piece sleeve. The fabric I used is a moleskin from my stash. Since this was sewing for weight loss, the princess line is good. I didn't line it so that I could take in the seams easier as I lose weight. However, this pattern would be nice with a lining, but that's another project.

I did have to rip out the sleeves after the first try since I noticed a little twist in the way the sleeve hangs. Repositioning the sleeve helped that, but I think I didn't get the curve of the cap just right when I drew the pattern. However, the sleeves look alright, but next time the curve needs to be different somehow.

I learned a lot about fitting myself, and I thank you very much for the help you gave me. I like Lutterloh patterns much better now. This jacket was fairly easy to sew together by following the way the pattern is connected. The seams that are sewn together are matched on the little pattern.

Well, Fonnell, thank you very much for arranging this sewcial. I have been following Ann's garment also, for knits, because I have some knit fabrics to sew, and I worry about getting them to fit without being too tight. I appreciate her help also.

Thanks,
Cheryl

Friday, March 12, 2010

More Manipulating of Lutterloh Patterns

In this tight economy who doesn't want to get the most bang for their buck? Here I'll outline how I'll use one simple pattern to create a couple more designs with more pizazz.


For those who want to follow along as I make my niece's birthday outfits this is where I'll start. As I mentioned in the previous post:


my niece K is quite small for her age. I recently made a corduroy jumper for her that fit great, so I've decided to start with that pattern for her tops.


Above is a photo of the fashion drawing and the corresponding pattern pieces I'll be using. There are actually additional pieces for the contrasting yoke and pocket pictured but I won't be using those.


Because this pattern uses such simple pieces I like to use it as an opportunity to manipulate the pattern a little to get some more interesting designs from it. I'll start with shortening the pattern by a few inches for a top because K let me know that she does not like to wear dresses. I wish I'd known that before I made the jumper.


So, with a little drawing on my small scale pattern pieces I came up with two different new designs. There are so many adorable fabrics out there for children that I want to use several of them in these outfits. Here are rough drawings of my new designs for this pattern:


The pink lines indicate where I'll cut the pattern apart to make new pattern pieces. The upper pattern will produce a top with a panel effect allowing me to use two different fabrics. I'll be sure to end my princess line at the same point on the front and back shoulder so they match up. Because I don't have to worry about bust shaping for a princess line pattern for a toddler I can just add seam allowances on all the edges except the center front where I'll cut on the fold. I wouldn't recommend this kind of slicing of the pattern for a grown woman. Once you cut through the bust area there are a whole set of issues you must address to fit the rounded bust area. Below is a photo of my new pattern pieces for the first design. I have relabeled them with the familiar Lutterloh symbols to distinguish them from the original pattern.


A = front, AC = side front, B = back, BC = side back


The second design will allow me to make a top with a yoke and contrasting gathered skirt. On the full size pattern I'll need to start the yoke line at the same point on the armscye and then measure up from the bottom edge on both the front and back pieces for the end point. I'll then start with the same number on my curved ruler to draw the yoke line so the curve will be close to the same, front and back. I'll need to slice my pattern up some more to get enough fabric to gather onto the yoke. Here's what it will look like cut into pieces.


To get the fullness I need to achieve a gathered skirt I've split the pattern in three places all parallel to the center grainline. On each pattern piece I make sure to start the first and last split at least an inch away from center front or back and again an inch away from the point at the armscye. I just make the center split at a halfway point between those two.


I want to spread the pattern so I end up with nearly double the fullness of the original. I measure the length of the curved seam from the center front or back to the point at the armscye to determine how much to spread between each split. Let's say the top of the pattern piece measures 5 inches. To double the fullness I'll need to add 1-3/4 inches between each split to increase the width to about 10 inches. Once I fill in the spaces with paper I need to draw a new cutting line to smooth out the curve at the top. In the photo above I've marked this in pencil.


Below is a photo of what the pattern pieces will look like all filled in and relabeled with the Lutterloh symbols. Notice I included the wavy line at the top of the skirt pieces to tell me to gather there. Stopping the gathering before the armscye will make it easier to finish the armhole with binding.


A = front, AL = front yoke, B = back, BL = back yoke


Now, before I do any slicing and dicing of my original pattern I will draw a new copy to keep as a master pattern. This way I can start with this same shape over again by drawing new copies for each new design. I'll also draw copies of the facing pieces I've worked out for this master pattern. Once I sew the princess line pieces back together I should have the same shape as the master pattern so I'll use the same facing pattern pieces. For the yoked top I'll just cut two each of the front and back yokes and use those for facings.


Alrighty then, this is the general outline for starting K's tops. I'll get to the pants later but I'm anxious to get sewing.


For the finished photos go to :

http://sewingnhumming.blogspot.com/2010/03/some-spring-sewing.html


If you're interested in more ways to stretch your patterns with similar techniques check out this post :

Monday, March 8, 2010

The Lutterloh System for Children

I don't know how many of you sew for children in your lives but I'm about to start a birthday gift for my niece and thought you might like to follow along.

Just like adults, children come in all shapes and sizes. Lutterloh does have a size standard that they design for to help us judge what size we should be working from.


Unfortunately neither of the children I sew for fit this scale that Lutterloh uses. This doesn't stop me from using the Lutterloh patterns for children with great success though. For children Lutterloh wants us to use only the chest measurement. Even very thin and rather plump children still have little shape to their torsos so the chest is usually the largest measurement we need to fit. An exception to this rule would be for a very round child whose tummy extended past their chest measurement. In this case you may need to use the waist measurement to fit pants and skirts. The key is to make sure to choose patterns in the correct size range and make adjustments for length.

So how do I decide what the correct size range should be? Well it just so happens that both of the children I sew for are 5 years old. However, both of them are very small for their age. My friend's son I'll call "R" is just small all over and rather short legged. His chest measures 56cm. My niece "K" is very thin and only slightly shorter than her classmates. Her chest measurement is only 54cm. As you can see, compared to the chart neither of them come close to what Lutterloh thinks a 5 year old should measure. I typically choose Lutterloh patterns in the 2-6 year range for them. According to the chart K doesn't yet fit into the 2-6 range but I know she has a vastly different shape from a 1 year old baby. Choosing patterns for a baby for her would result in garments that were way too short all over. Babies tend to have shorter, plumper limbs than older toddlers so I at least need to stick with a toddler size range.

You'll see from the 1976 photo above that Lutterloh generally tends to categorize their patterns in ranges that cover about 4 years with some overlapping going on. If you had a rather "large for their age" 4 year old you might very well be able to use all the patterns on this one page. I have found that for K I can now use patterns in the 2-6 up to the 4-8 range. Because I use her chest measurement my patterns fit great in all the circumference areas but because this measurement is so small I then need to lengthen them all. The smaller range patterns I usually only need to lengthen a couple of inches but I recently drew out top and pants patterns in the 4-8 range that I needed to lengthen by more than 5 inches.

So, when deciding what size range to use for your child, you need to consider their stature as well as their measurements. Ask yourself is my child average sized compared to other children their age? For very petite children you may need to use a smaller size range than their age. For the bigger, fast growing children you may need to use patterns intended for slightly older children. Just remember to always at least paper fit your pattern before cutting out your fashion fabric. This should give you an idea if you need to make any length or ease adjustments before any fabric is wasted. If your child is far from average it might be a good idea to make a test garment in an inexpensive fabric first. This will help you determine the adjustments you need to make to all the child's patterns in this range. At least until they grow again. :)


Check out the next post:

http://sewingnhumming.blogspot.com/2010/03/more-manipulating-of-lutterloh-patterns.html

for more info on the patterns Ann will be using for K's gift.

Sunday, March 7, 2010

From the orginal Blog I deleted

I first started this Blog to help anyone trying to use the Lutterloh system. When I was asked to remove my blog I lost this posting. Today by magic it was found. I say Magic because I have no idea why someone else had it online but I was able to find it and return it here.
Soon you will see a posting from Ann that will get you started in some more sewing for children. I can't wait! Until then enjoy how I make Lutterloh patterns for babies!


Tuesday, April 14, 2009
What to do if the size is a small child


I have many old Lutterloh books from all over the world. The fashions are breath taking, the history is loud and clear. There is a new baby in our family, a grand daughter and her mom wanted a special dress for her church ceremony. I took out my books and found this sweet little dress. The book it is in came from Brazil so I can't read the pre-directions in the front. he he!


#107


The only problem I found is Penny is only a tiny thing and she measures 46 on the Lutterloh ruler. If you look you will see there isn't a 46, the smallest it goes is to 50. If I use 50 that will make this dress TOO BIG. You may run into this one day and so here is what I did.

1) Put the holding pin in the bottom most hole and put it through the X in your pattern

I used pattern #107 below. Lets make the skirt


2) Make a second ruler top by printing a copy of yours on card stock.
You will use this to remove the extra.


3) Do a little math on the newly printed ruler. Penny's pattern will be too large by three spaces 46 to 50 on the ruler count to the 4Th line to get the three spaces. A sticky page marker put on the spot helps. Or just work from a number close to yours I used 66 and put a marker and went to 60 on the card stock tape top.

4) I put my pin in at 50 and Penny needs her pattern made at 46. The first number on the skirt pattern is #23 at the top waist. I pull my tape out and find #23 on my original tape then I lay my printed card stock tape top on the #23 line and measure off my three spaces. I made my mark there. Don't be tempted to just add on the original tape measure because it won't be correct. It is slightly different. Be sure you put your Dot on the correct side of the tape, the side that lines up with the Number #23 line at the pattern.

We are subtracting the three spaces for the correct size.


I have two tapes the green shows the 23 the pattern showed the orange tapes show the amount I must remove. Yes remove. so I put my dot at the top orange mark, 3 spaces above the bottom orange tape.


Once you do the math this goes just as fast as any pattern would and I got a perfect size pattern. I always lay the pieces out and measure to be sure I have the kind of ease I would want in a pattern.

Penny is a baby and everyone will be picking her up and down so I wanted to be sure there was room for her comfort. She measures 17" in her chest and the pattern made 22". That is 5 inches of ease and that will be plenty and work with that full skirt.


This is the finished dress. My daughter in law wanted the dress shorter, only to the babies feet and she had the idea for adding the ribbon. I can't wait to show her my Lutterloh baby dress! I think I would have removed an inch of the ease now that I see it on her but I was far away when I made this dress and could only guess by using the measurements.


Saturday, February 27, 2010

Something you might find helpful


I know many beginners find it hard to know where to start when sewing patterns they made themselves. Unless you are seasoned with the step by step of sewing a blouse, pants, a skirt etc you will look at your Lutterloh outfit all cut out and may not know where to start.

I know this is a bit unusual but I am only loyal to helping you enjoy sewing. So here it is. This Bonfit American Fashion sewing instructions book is excellent! It's not very big but very comprehensive. They take an outfit and go step by step though how to sew it. From this you can do it again and again with many styles. It is only one method per fashion piece but that is OK when you are a beginner or even forever if you like. There is fabric advice and interfacing ideas, and step by step for skirt, pants, dress, bodice and jacket.

I got my copy off of eBay but I have seen them on Amazon.com. I've put the cover up above so you get the correct one. This one only focuses on how to sewing instructions. Don't get one of the many others put out by Bonfit.

I was surprised to see Connie Amadin Crawford co-wrote this book. She lives here in the Pacific Northwest and my contact with her has always been very positive. She knows her stuff!

Hope this is helpful!

Saturday, January 23, 2010

The BLUE Group patterns for weight issues

This is the Blue group
and here is our first finished project!
Congratulations Joanne
What a great job figuring out a new way to do this pattern!


Making this jumper has been quite an enjoyable experience. It was somewhat like doing a puzzle...challenging to the mind, but I enjoy challenges. My main concern was my hip area. I wasn't so concerned how the top would turn out because my vest fit well without alterations, so I thought I could just make adjustments in the hips and thighs... well, it wasn't that easy!

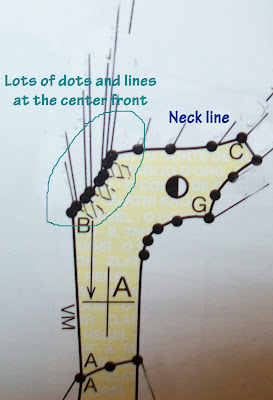
My first challenges were in drawing out the pattern. The center front had so many dots and lines where it gathers that it was difficult to tell them apart. It also took me a while to figure out that the 5 dots going across the top of the center front were actually the neck line. It looked more like a shoulder seam to me, but after doing some basting and gathering the front, it was much easier to see. By the way, this gather line made the dress very difficult to paper fit...which lead to other difficulties later.


The other challenge I had with drawing the pattern was that my bust measurement made my waist dots come in what I thought was too far - so I ignored the waist dots and joined the ones above it to the dots below the waist. A mistake!

My next project was to figure the amount of fabric I would need. Thanks to the suggestions on a previous post on this blog, I laid out my pieces on the floor to measure. I bought exactly the right amount of fabric! Thanks for the post!

In sewing the jumper together I found that the waist was 7" too big and the bust 5" too big. I could take it in at the sides, side backs, and back - but not the side front because it would make the drop waist seam not match up.

The hips were just fine and the fitting was easy. I used 3/8" seams over the thigh and hip area. No problem there.

I didn't put a zipper in because the fabric is stretchy. It slips on nicely.

I think there are three reasons the top was too big.

1. I didn't do the waist dots right.

2. After looking at Ann's post - she doesn't add seam allowance for knits. This wasn't a knit, but it is stretchy. It probably has some spandex in it. I could have left out the seam allowances.

3. The last reason is that I now remember I used a smaller bust measurement to make the vest because I wanted it to fit when I drop some pounds. Perhaps if I had remembered and done that with this it would have not needed so much adjustment.

All in all, I am happy with the results. Thanks so much for letting me participate in this event and for all of the great information!


Joanne
***************************************************


Fonnell is working on this pattern


The first thing I consider in choosing a pattern is how it will look on me. Weight gain and weight loss can hit different area's of our body. A good look in a full length mirror will help you see your shape. Your shape will determine what looks good on it.


There are hints for every body shape for dressing. Now we have TV shows, book after book and even web sites devoted to finding your body shape and how to dress for it. I can make a couple of recommendations for books you might like. I use my local library a lot. But truly there is a lot of information on dressing for your shape.


I am 5 feet 5 inches tall and I am a balanced vertically. My waist is in the middle etc. I would work perfectly into the golden rule pattern for body shape in the vertical! It's the horizontal where I loose the battle. My rectangle shape has a bulge in it. My shoulders are slopping and this adds to the horizontal issues. I know I look better in skirts that slant as wide as my waist. I look better in princess line tops so that the eye will look down the line and go onto the skirt line and not focus on my heavier bust. So this is what took me to choose this pattern.


When I draw up my skirt pattern I will be very careful not to make it too tight. I want it to look balanced with my wider waist area. I love the godets because it will add some kick and width at the bottom so my legs don't look too small (yes they are smaller) If I make any one part of my body look smaller than the rest it will throw off the balance and that will make my large areas look larger and my smaller area's look much smaller. So reach for balance in your pattern choice.


My 2010 goal is to loose a lot of weight so the seams in this outfit will allow taking in as I go. I will be looking for some ways to make that easier as I go, like the buttoned elastic.


The top is made in a knit but I don't have to make that knit tight, I want to make sure it hangs off my shoulders without grabbing my waist. First I must choose the knit fabric before I even begin to make my pattern for the knit top. I need to know how much stretch is in my knit fabric. If you don't know about all the many kinds of knits and how to use each I highly recommend this online class, it's wonderful!


http://sewing.patternreview.com/cgi-in/sewingclasses/index.pl#342


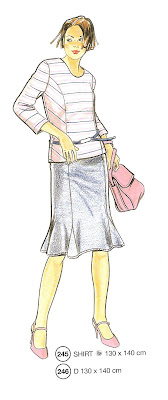
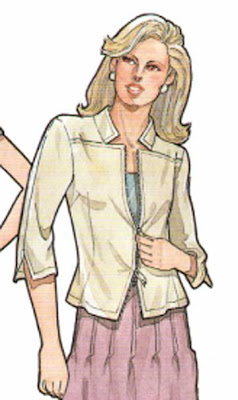
This should be a quick outfit to make. In looking at the pattern right away I see that I need to pull the waist of the skirt out straight and perhaps make the sides a little wider so the skirt is makes a wider line than my waist. Likewise the top has a pulled in waist and a dart. I think I will straighten out the side seams and use my dart and seams to get the fit I want. The red lines just my plan. Knowing that I do this in most all patterns. There will be more I'm sure.


Did you know that a 3/4" sleeve will bring the eye down past the middle of your body and draw the eye away from a larger bust? Where a sleeve ends can make a big difference in the flow of the eye. Can you picture my pattern with long or short sleeve. It makes the outfit look different.


Summing is all up: Knowing something about your body shape will help you choose your pattern. Finding patterns with extra seams will give us places to subtract or add to depending on our need.


Reading you could do to determine shape:


Dress Your Best by Clinton Kelly & Stacy London-I like this book because they used real people and let you see the outfits they thought would improve the body shape. My body shape wasn't exactly in the book but I learned a lot. Great read.


Does this make me look fat? by Leah Feldon-some drawings ,no photo examples but great written ideas IF you can picture what she is describing. What would a few pictures have hurt! She covers everything even jewelry choices so it's worth a read if you have time.


Looking Good by Nancy Nix Rice (Palmer/Pletsch) Great drawings and a nice brake down of subjects. Body shape is nicely covered. I skip the color work and fashion style, you can not put me in a box, in a group. It just won't work. Some days I'm classic some days I'm a romantic some days something else. Making the wall drawing of your shape really tells you a lot. This book looks like it walked out of the 80's so don't be looking for style just information on shape.


Fit for real People (Palmer/Pletsch)- Great information start to finish. This is a sewing book for getting a pattern to fit you but the examples are great and the first couple of chapters have tons of great info.


Dressed to kill.....gently By Peggy Sagers- I liked the way she determined your shape with a few measurements, the drawings get you thinking, but you decide what is right for dressing for yourself. I feel that's true with all the books they each have their own strong ideas but you must decide this for your own life, location and personality.


Staging Your comeback A complete beauty revival for women over 45 by Christopher Hopkins, also does it with measurements also and a nice little test or two. Fun. I loved this book, so Hollywood!


There are more but really....Lets choose a pattern and work!

********************************************************

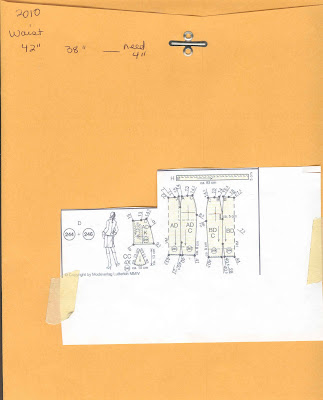
This chart is for my body shape and tells me what outside shape I can use to best use with my own shape. The chart for all body shapes can be found in "looking Good by Nancy Nix-Rice (a palmer/pletsch)


As you can see if I do a triangle shape over my rectangle shape I get the illusion of hip curves....Well not exactly what I want....But the inverted triangle shape looks interesting. Keep watching for more of my sewing for weight and weight loss.

******************************************************************

As the next phase in making my outfit for weight loss I gathered some supplies.

A calculator, pencil and paper, tape measure, Scotch removable tape, my pattern page and my pattern paper, my packet with my tack and Lutterloh ruler, etc.

I know many of you bought your lutterloh system because you were told it would fit with little or no adjustment. I however share no such belief. I know ALL patterns need adjustments for me. So because this is very true I have taught myself how to adjust patterns. It leaves me having no fear of any pattern. You will find a great freedom to love your lutterloh patterns if you add some fitting skills. It's your choice. Learn to fit or put that book of patterns in the closet so that 10 years from now the next willing seamstress will have a chance at it. Sorry to put it so bluntly but I feel this is so often the case.

Now let me help you do a bit of fitting.

Measure yourself in a few more places:

Bust

chest (above bust)

Waist & distance from from shoulder over bust and down to waist


hips & distance from waist to hips.


width of your shoulder (from where your neck starts to where the bend in your shoulder is if you raise your arm)


Mostly this is all I need but I do keep a front cardboard sloper that notes how low I am willing to go in my neckline. This way if I love an outfit but it's too low I can lay the pattern drawn on my paper over my sloper and see how low and correct it. It's an easy fix to raise things up to where I prefer.

Ready

1. using your known number on the lutterloh tape, draw out your pattern pieces using your bust (or chest combined) and your hip measurment. Do Not cut them out yet and leave plenty of space around the drawing for adjustment.

2. Starting with the bust, measure the front and back pattern around the bust line, hopefully you will find this easy to find. One the waist once you measure the pattern you must also measure from the shoulder over the bust to the waist to see if your bodice pattern will be long enough. Same with the hip. This is just a beginning as paper fitting will tell us a lot more!

3. Get a paper and draw three column's on it. In the first put your measurements for each area. In the 2nd column put the measurements we are taking from the pattern. In the 3rd we will figure out our ease and our needs, write in the difference between the numbers in column 1 and 2.


4. I know that my chest and shoulders are much smaller than my bust so I make my lutterloh pattern with my chest size mostly and do the larger bust adjustment. If you know that is your issue do that now. (how to do this to follow or look it up online)

5. Note the difference in your measurement from the pattern. Is it very much? if you choose a princess seam like mine I have 8 seams to spread the changes within. note the difference in column 3

6. Continue to measure the pattern at the waist, hip and check that your shoulder is long enough or short enough.


Get all of this ready, all three columns filled in and stand by for what I will be doing next


write the figures on the back of the pattern if you wish

My front sloper with neckline low noted with red arrow

************************

http://sewingnhumming.blogspot.com/2009/09/difference-between-ease-and-fullness.html

Today I'm going to ask you to please read the posting on ease, link above. Or re-read it. All of what we do next is about the different factors of ease.

Get to know what amount of ease you like. If you are making a top go to your closet and find the top you like most. The one that feels good on you. If you don't have anything that you love the fit of you will have to experiment as we make Lutterloh patterns.


Now pinch on one side all the ease. Pinch at your bust and note the amount. Pinch at your waist and note the amount. Pinch at your hips (coats and long tops) and note the amount. For skirts and dresses be sure and pinch the hips also and maybe even lower taking note of the distance from the waist you took that pinch at. (measure one side of the pinch and double it)

Armed with the following you will be ready to adjust your pattern

1. Your list of favorite ease amounts (pinch project!)

2. your measurements for bust, high bust (chest), shoulder, waist and hips

3. The pattern you are makings measurements for these areas

Tomorrow I will have photos of how to do a paper pattern fitting so you won't make mistakes in the fabric but only on the paper!

If your chest measurement and Bust measurement are at least 2 inches different please go to this web site and read up on the larger bust change you can make.

http://www.timmelfabrics.com/fullbustalteration.htm

This link is so clear cut any one can adjust for a larger bust and I know I do it all the time!

http://sewmamasew.com/blog2/?p=486

This link has a project done step by step

Go ahead and test this out. Draw your pattern using the chest measurement and then make this adjustment. Paper only. Do a paper fit and see how it goes for you.

********************************************************


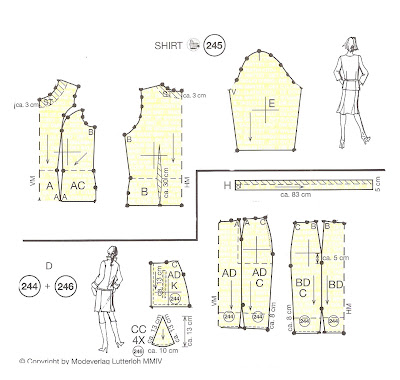
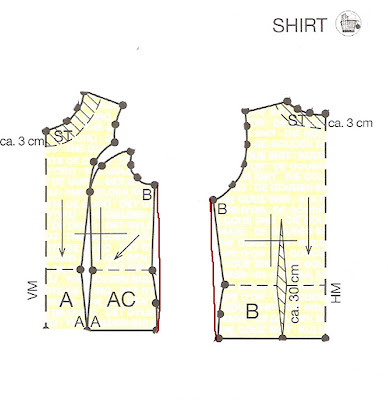
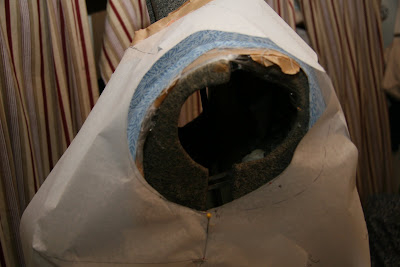
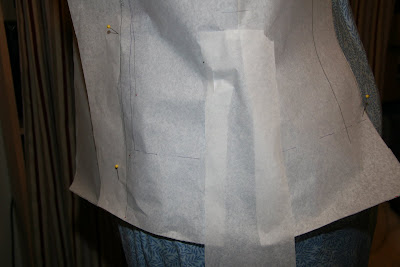
I think today I'd like to cover paper fitting your pattern. Above is a coat pattern one of our readers is trying to make. I find most everything I need to correct is found in paper fitting. First make your vest and get it fitting just perfect. Note everything you must change. When you draw up your pattern, before we do anything, you can make those changes you made in the vest. I always have to bring the hips up and make my shoulders smaller. Every time I make a pattern.

If you took your measurements and put them in a column you can now measure the pattern. Are there big differences? If so wait until the next posting to continue. But if you are almost matching in most areas then you have the correct size on the lutterloh tape and we just need to do some paper fitting!

Now it's time to paper fit the pattern you just fixed with the vest changes. Because I am a round person I leave the sides uncut on the paper pattern, but I cut out all the rest of the pattern. The extra paper on the sides allows me to add in the areas that I need most.


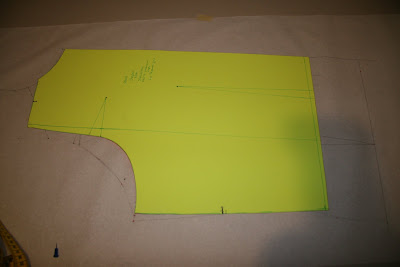
I have a sloper I lay on my patterns to see where I would be within that pattern. Already I can see that the arm scye is going to be tight, I can tell that the coat is too long and there is no ease in the pattern, which I know a coat needs. See what it looks like when I draw a line around the cardboard sloper onto the pattern.


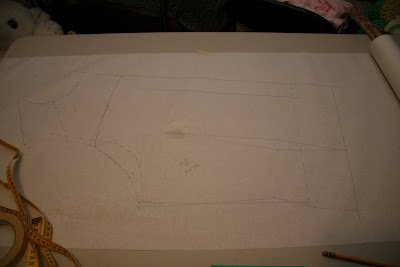
It is hard to see white paper on a white table but click and it will enlarge.

see how my sloper lines are right against the pattern lines? That leaves me no ease at all.


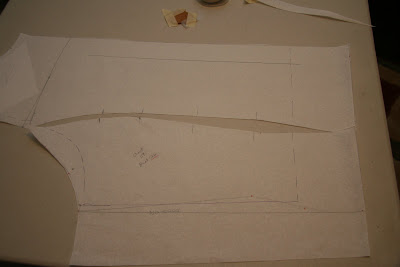
This is a coat pattern and it has many pieces. You draw the multi-pieces as one and then cut them apart into two or three. Do draw some lines across the two pieces before cutting them apart. That way you can match them easily. In this pattern the back is in three pieces, the sleeve is in two.

This sews up like a jeans jacket. I think I'll make some in some fun tapestry fabric. It's heavy and can be worn unlined.


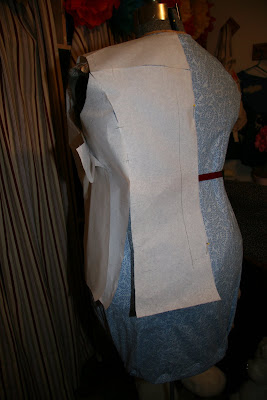
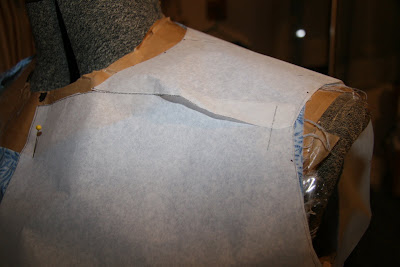
In pinning the pattern on the back half I carefully make sure the center of the pattern goes down the dress forms center. Or if trying on yourself make sure you pin the center to your center. (use what you are wearing to pin to) By keeping the pattern level and going down the center back I can see what needs to be adjusted.

I try to always adjust on the sides not the middles.

This pattern is too wide across the shoulders and not wide enough in the hips. I untape the sides to let the pattern open to what I need. later I will tape some paper in the space and divide it in the center. I use re-useable scotch tape so I can remove it for using the pattern for the fabric. You can't leave it on for a week or so it will just come undone!

There are bubbles of fabric in the front and back shoulder. This means one of the pattern pieces is too long. Because this pattern has the back drop into the front it takes a little careful consideration to choose where to fit. Remember NEVER over fit. A coat needs more ease anyway. The sleeves will pull some of this bubbling down but I do want to shorten some of it.


All fixed now. In the end I will change the shape of both pieces so that the impact of change is slight on the back piece and the front and so that the yoke line will be nice.

I like how it's fitting now.

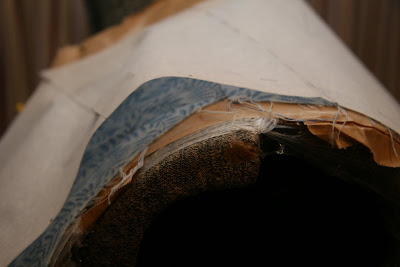
Can you see how the back yoke is also the front yoke?


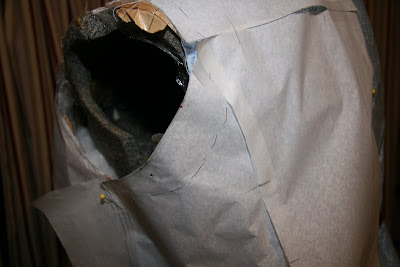
Here is the arm scye with both the front and the back put together. For sure I'll need to lower this some and then walk the sleeve into the pattern to see if I must add some on the sides of the sleeve. The sleeve is in two pieces but I would only add some to both edges.


A better look at just the front piece. I added some on the side and then cut off the spare paper so I can fit the back to it. I DO NOT add my seam allowances or hems for paper fitting. Just butt your papers up to one another and put on a piece of tape.


Here I have taped some paper in the opening in the back. Because this is where two pieces meet I will divide the paper down the center. Add horizonal lines for matching.


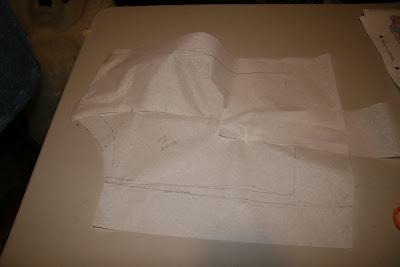
When I lay this bottom piece on the table it's clear it's not matched well. I leave the bottom taped so I don't loose how wide it needs to go and I re-tape the top until it's flat and then take a ruler and run it down the center. I cut it out and then just taped it back together. Now the jacket goes over my hips.

This outfit is too long for me. But I did all the changes first and then will shoten each piece at a place it won't change my work to fit the hips. You could shorten the coat first but if there are bust changes you might find you needed some of the length left in the pattern and you'd have to add it back...he he


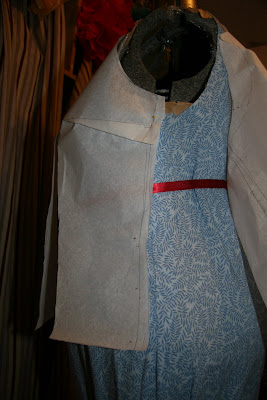
Here is the whole pattern. The pattern was tight around the hips (or tummy!) so it didn't need the dart called for in the front. I however felt the style needs that dart and it makes a nice vertical line in my clothes to help me look slimmer. So I cut open the area where the dart would have gone and I will add paper there to make enough ease for a dart. It doesn't have to be a big dart just needs to give me that vertical line.

I'm still pretty sure I'll need to drop that arm scye some. This is a current fashion and it's not a factor of another time period. I find it odd the area is so tight. Someone else found it too loose. If you don't fold down the back so it bends into the front yoke you will have a much too large arm scye.

The neck is decorative and it may be too high on me so I'm going to put this paper pattern on myself and see. If so I'll bring it down some. I'll let you know how it fit me.

It's really nice if someone else will look at the paper pattern on you. Tell them to start at the top and look at one area at a time. If helps not possible strive for two mirrows so you can clearly see front and back. When doing this on yourself be patience and make tiny changes, re-try on and then make another change. It will help in avoiding mistakes.

I bought two mirrows at linens and things, the kind that hang over a door. I go up into the hall and am lucky to have two bedroom doors at the right angle for seeing the front and back.

Do you have any questions?

****************************************

Joanne is joining the BLUE Group:

"Hi Fonnell,

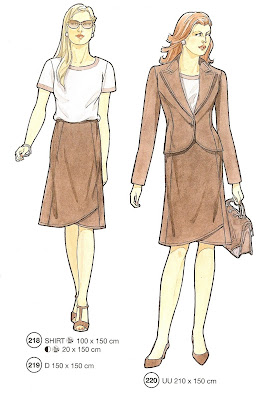
I think I would like to start off with your group. I have chosen this pattern and would like to make a jumper out of it. The jumper would be like 17 without the sleeves. My biggest challenge in fitting is the bottom half. I am definitely a pear! This pattern has a lot of seams in the lower half, so it might make fitting easier."


*********************************************

Cheryl is joining us. She has not had any luck in fitting other Lutterloh patterns and hopes to correct that this time around. Here is the pattern she is going to try. Very cute really.


The RED Group - Using knits on Lutterloh patterns for wovens


This is the RED Group to follow for the Lutterloh Double Fun Sewcial.

We'll be discussing what changes need to be made to a pattern designed for wovens so we can use a knit fabric.

I would like to start with directing you toward a stretch gauge chart for knit fabrics. The chart is on the last page but I recommend everyone read the whole document. You can find the chart here:

http://www.ca.uky.edu/HES/fcs/FACTSHTS/CT-MMB-165.pdf


Here is a photo of the pattern Ann will be using:

Because we will need to remove ease from the wovens pattern I would suggest a closer fitting style and a fabric with no more than 25% - 35% stretch. Some patterns can be reduced to accommodate fabrics with a greater degree of stretch but much more ease needs to be removed resulting in more complicated pattern alterations.


Some considerations when choosing your pattern:

Have you made the Lutterloh basic vest pattern to determine proper fit? It will be difficult to determine the correct amount of ease without a good fitting pattern to compare it to.

Look for patterns with fewer horizontal seams; these seams will need extra stabilization.

Button plackets and zippers will also need to be stabilized. Sometimes, depending on the stretch of your fabric, zippers can be eliminated altogether.

Knits typically weigh more than wovens so necklines and armholes may need to be raised.

Patterns with facings often don't work well with knits. You may need to substitute bindings, ribbing or a turned and stitched edge finish.


*************************************************************************


In the photo above I have marked the changes needed to adjust this pattern for knits with minimal crosswise stretch (18%-20%). For knits with more crosswise stretch (25%-35%) the side seams should be adjusted in further by 1/8"-1/4". I wouldn't raise the armhole or length of the pattern any more unless your fabric has lots of lengthwise stretch too.

Notice I have extended the neckline as well. Since this is a wrap dress and my knit is heavier and drapier than most wovens I don't want to chance any gaping in front. I will stabilize this area with clear elastic at a 1:1 ratio when I finish the neckline.


You may have noticed that most knit patterns do not have many, if any, darts at all. The stretch of the knit is usually enough to compensate for the extra fabric needed to go over our curves. If you prefer a bust or waist shaping dart in your knit garments then by all means leave them on your pattern. I prefer to eliminate them so the photo below demonstrates how I will rotate the back shoulder dart to the armhole on my wrap dress pattern.

Photo 1 shows where I have marked a line through the center of the dart extending it by 1.5" to create a pivot point. I then mark another line from the armhole to the pivot point, roughly perpendicular to the center back.

Photo 2 shows where I have cut away the dart all the way to the pivot point. I then cut the line I marked for the new dart up to, but not through, the pivot point. You need to leave a tiny hinge of paper to hold the pattern together.

Finally Photo 3 shows where I have closed the shoulder dart, opening up a new dart in the armhole. This armhole dart will not be sewn. Instead it will create a little more room in the armhole for stretching forward. You will need to add paper behind this whole shoulder area because you still need to true up the shoulder line and the curve of the armhole.
Lastly, I will mark out the waist shaping dart altogether and leave this as extra ease so my dress won't be too clingy. I can always pinch a dart in later if I want it to fit closer.


My wrap dress already has the front bust dart rotated to the shoulder for gathers. If you want to eliminate your front bust dart you will use the same steps as above resulting in a pattern piece that looks similar to the photo below. Again, the armhole dart will not be sewn.
As you can see this changes the angle of the armhole near the bottom so you'll want to rotate these darts before you raise the bottom of the armhole the suggested 1/2".


Because you have changed both the armhole and the sleeve cap you need to measure both lines to make sure they still fit. Do this by turning your measuring tape on edge and walk it around both the front and back armhole edge. You'll need to do the same thing with the curve of the sleeve. If the sleeve curve is the same length or up to 1" larger you won't need to change the pattern. If the sleeve measures smaller than the armhole then you'll need to redraw the curve in the under arm area until the sleeve measures at least the same or slightly larger than the armhole. See the photo below:


When I measured the length of my sleeve curve it was shorter than the curve of the armhole. By drawing a deeper concave curve (in pencil) at the sleeve cap this lengthened the line so my sleeve curve is now 1/4" larger than my armhole.


**********************************************************


I have finished drawing my pattern and need to determine how much ease to remove at the side seams. By measuring my dress pattern and then comparing those measurements to my favorite T-shirt pattern I see that I'll need to remove 1/2" from each side seam. That will remove a total of 2" of ease from the dress pattern. 1/2" x 4 = 2"


In case you're not yet sure how much ease you prefer in your knit garments go to this link to see how the major pattern companies describe ease:

http://www.taunton.com/threads/pages/t00027_sb2.asp


Below is a photo of my dress pattern cut out with my favorite knit T-shirt pattern on top of it. I usually wear my T-shirts fairly close fitting so this pattern gives me a good idea of the amount of ease in my altered dress pattern, very little, just the way I wanted.

I have lined up the patterns at center front and center back.

On the front piece you can see the armhole doesn't line up well but once I sew in the front gathers this will draw up all the extra at the shoulder.
The back piece is actually a tiny bit smaller than my T-shirt pattern but I'm not worried. My T-shirt was sewn in a cotton interlock and my dress fabric has more stretch than that.


OK, my dress pattern is all ready to cut out in fabric. I have measured the shoulder seam length, looks good; I have made all my usual pattern adjustments for length, full bust and sway back.

Now that my pattern is ready I will cut out the fabric and start sewing today!


*****************************************************

So today I have been cruising right along sewing up my wrap dress. I did want to point out that I often do not add seam allowances when cutting out knit patterns. I cut right at the edge of the pattern and serge the seams with a 1/4" seam. This in effect reduces the ease in the pattern by another inch all over. I know that I like my knits to be close fitting so as long as the fabric has more than 25% stretch this method does not worry me.


My first seam, naturally, was the shoulder seam. Here's a photo of that seam after I stabilized them with clear elastic tape.


After the shoulder seams were serged together I measured a strip of clear elastic the same length as the shoulder seam and zig zagged it right over the previous stitching.

I decided to take up the fullness in the front shoulder as three released darts (or tucks) instead of gathers. I don't want this dress to actually look like it's from 1979 after all.


I have since attached the sleeves, they went in without a hitch, and serged the whole dress together at the side seams. So far so good, the small amount of ease left in this dress is just what I like. I still need to attach the wrap ties, wrist cuffs and binding around the whole front. This may have to wait a few days until I have a day off again but we'll see.


***************************************************************

Well, I finished my dress this morning and I'll have to say it is a success! The only difficulties I encountered were trying to gather all that flared sleeve onto the narrow wrist bands. Oh and the binding at the edge was a little fussy too but that was just a matter of getting the measurements right. I measured around the whole outside edge and subtracted two inches for a little extra stretch in the bust area.

Instead of using clear elastic and turning the edge I used black fold over elastic and bound the entire edge. This helped to echo the solid black I used for sleeve bands and ties since I ran out of the print fabric. I applied the elastic at a 1:1 ratio from the waist down and stretched it slightly around the front and neck area. This keeps this area nice and snug so there's no gaping at the front wrap.

I used the tips in this article to hem the bottom with no wavy edges:

http://www.threadsmagazine.com/item/4584/a-primer-on-sewing-knits#Fine%20details%20for%20knits

I decided not to sew in the back fitting darts after all. There's a little room in the back but I don't want this dress to fit like a second skin so I'll leave it as is. So I suppose you might want to see a photo, huh?


Here it is all done. My husband even said it turned out better than he'd expected. He doesn't usually have much to say unless the outfit is blue. What does he know anyway?


This will conclude the RED group portion of the Double Sewcial.