Chart for how I work on patterns
(Please note any fitting issues from your vest before beginning.
Make the needed adjustment to patterns you will use to make slips etc.
before beginning the below process.)
WANT MORE
than just the fashions in your Lutterloh book?Ann and I have been showing you how to change the fashions to fit your needs. Many of you have said you need slips, aprons, sleepwear & bras and those patterns aren't in your books.
Let me show you how to make a full slip from a sheath dress.
If you want to see an apron made from the sheath dress check out the Apron Sewcial photos!
http://sewingnhumming.blogspot.com/2009/10/vintage-apron-sewcial.html
First choose a pattern that is close fitting with simple lines
You've seen this one before. Each book has at least one.
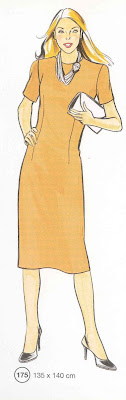
Here is the pattern I am going to use.
A sheath dress

This dress is perfect for a fitted slip.
It has the traditional 2 darts in front one dart in back.
It takes a couple of steps but do a mini practice run on a scanned and printed copy and you will see how very easy this slip pattern is to make.
Also once you make the changes to the bottom bodice
you can put it back together into a sun dress for summer!
********************************************************
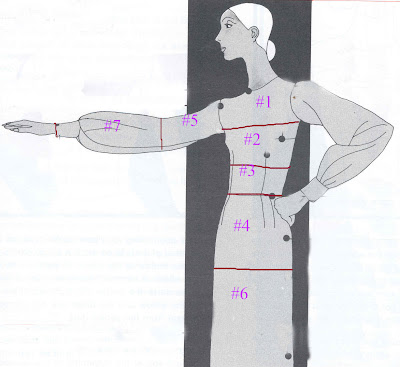
Before we start making our slip here is how I think of my patterns.
Looking at the drawing at the top of this posting you will see my model broken into seven work spaces. I can cut my pattern at these points and make changes and then reattach to the whole.
Let me explain each space
space#1 This is the shoulder, armscye and chest area. Garments hang from this area.
I like it to fit it perfectly so it deserves careful fitting.If we need to be smaller in this area yet are busty Ann suggested you take your measurement under the arm and over the chest in this area. You may move darts to the shoulder here, or add a bit of gathering at the bottom of this area. You will embellish here but mostly you work on fit in this space.
space#2 This is the area I make bust changes in. Darts move within the dart circle in this area. The slip will be designed using space #2 & #3.
space#3 THIS is a GREAT area for design ease. You can play in this area, do you like fitted or free and flowing. Do all that right here. You can widen it and gather it against space #2. You can make it as long or as short as you wish. This is have fun and design space.
space #4 This is our hip area and it requires some careful fit. It is one of the easiest places to get a correct fit. This does include the crotch which drives many people crazy. Once this space is fitted you have skirts and pants galore you can design.
space #5 Another careful fitted area. The armscye and shoulder and upper arm. If this fits then you can have any kind of sleeve beyond this area.
space #6 & #7 Design areas. Any kind of pants any kind of sleeve can be added to this line.
************************************************************************
Lets have some fun cutting our pattern
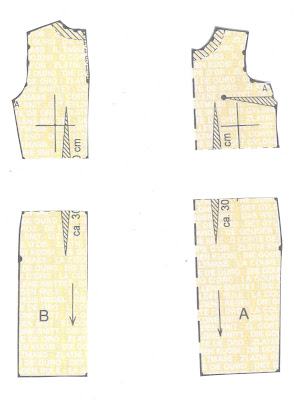
Find the waist line markings and cut the bodice off of the skirt at that line
#1 We will first work on the bodice to make it tighter and lower.
The goal is to make sure the slip is well hidden under your outfit and not so loose as to cause bubbles under your clothes.
#2 The next line will be made at the bottom of the armscye. You will be removing Space #1 and working on space #2 & #3. You can choose how high or low you want your slip by where you decide to put and cut this line. This line can start at the underarm and angle up to where it will be in the middle of the chest.
 Decide how low you want your slip or sundress to be. Lay the paper pattern up to yourself and see where your bust circle goes. You will need to put the line higher than the bust circle. I have marked my cutting line in red.
Doesn't look like much now but it's soon to be a top of a slip
You could sew straps on this, connect it back to the skirt and have a slip
but it would be much nicer if we did some fitting so that the top line is snug.
How to do a fitted slip bodice.
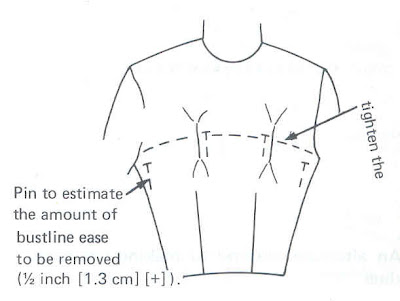
Try to hold the paper pattern up to yourself (I use re-stick able scotch tape to put back and front together) and pinch to see how much you need to tighten things up.
You just might find this impossible. Often you need to get some scrap fabric and sew the front and back together ,sew the dart and pinch at each side right at the side of your body. Pin the pinched amount closed and measure to see how much fabric we need to remove to tighten up the top. You can do a good guess at how tight you'd like this and process with a test run.
A pinch is two sides so measure one side but do remember it is double that amount.
Lets say when you pinch you find you need to remove 2" on each side. (a one inch pinch)
That is 1" for the 1/2 front pattern and 1" for the 1/2 of the back pattern.
Really a total in the bodice of 4 inches
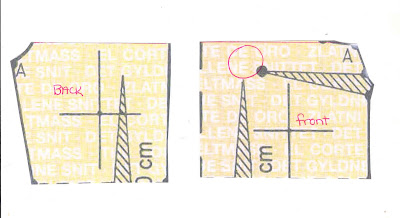
#3 It's easy to remove the 1" from the back piece (we are only working with half a pattern)
We remove the ease in both the dart and the side
Cut up though the dart until you have two pieces
I cut the dart out in the picture below. 
tape the top back together
by over lapping 1/4" at the top swinging to leave the dart open but not as big as before
and then remove another 1/4" to 1/2" inch on the top side tapering to nothing at the waist.
The red areas are where the back was made smaller

Do the same thing to the front as so..............

Remove darts, cut straight up from waist line up through to top of bodice.
Make a 2nd cut from side across the level part of the dart and to the first cut
We have three pieces now. We will be keeping both darts but they will be shorter
 Tape the front back together over lapping the top seams by 1/4" and removing 1/4" to 1/2" off the side. You still need the darts for the fitted slip but they will be a bit shorter.
You can trace this on paper and do a paper fitting, my first choice or test on fabric.
Once it feels like you like it to fit.............continue to..................
Add bodice bottom back into the skirt.
Put the bodice back on the skirt. Decide if the skirt shape meets your shaping needs. Shorten the skirt of the dress (I never want any of my slip to show unless I made it to do so!)
If your skirt is tight add a side or back opening for leg movement.
Add straps just above the bust point and over the shoulder to the back.
It looks a bit odd but once the darts are closed it's a fitted slip!

Now for some Optional slips ideas

I cut a bra shape in the top of this slip, it would be pretty in lace.
I shortened the slip by a lot and gave it a little bottom flare for a cut princess dress that so many of the kids are wearing.
You can cut your top line on the bra shape any way you want just center it over the bust point.
Lay a paper pattern over yourself and draw in a slip shape you like in the chest area.
************************************
Below are some examples from a 1940's sewing book. It is out of print and all it teaches you is how to hand sew these items.
However there is so much to learn from looking at these finished slips and reading the descriptions, it will also give you ideas on shaping that front bodice piece.


Not Lutterloh patterns


